Introduction
Microsoft Entra Connect Sync (formerly Azure AD Connect) is the backbone of hybrid identity management, enabling seamless synchronization between on-premises Active Directory (AD) and Microsoft Entra ID (Azure AD). This comprehensive, step-by-step guide provides IT administrators with best practices for deploying, configuring, and optimizing Entra Connect Sync in enterprise environments.
Key Benefits of Microsoft Entra Connect Sync
✔ Hybrid Identity Synchronization – Keep on-premises AD and Azure AD in sync.
✔ Password Hash Sync (PHS) – Secure authentication without exposing on-prem passwords.
✔ Pass-Through Authentication (PTA) – Enable direct Azure AD logins using on-prem credentials.
✔ Seamless Single Sign-On (SSO) – Improve user experience with automatic logins.
✔ Group & Device Sync – Extend group memberships and device registrations to the cloud.
Prerequisites for Deployment
Before installation, verify:
✅ Server Requirements – Windows Server 2016 or later, .NET 4.7.1+, PowerShell 5.1+.
✅ Permissions – Global Admin in Azure AD & Enterprise Admin in on-prem AD.
✅ SQL Database – Required for large-scale deployments (SQL Server Express is installed by default).
✅ Network Access – Outbound HTTPS (TCP 443) to Azure AD endpoints.
Step 1: Download & Install Microsoft Entra Connect Sync
1.1 Download the Installer
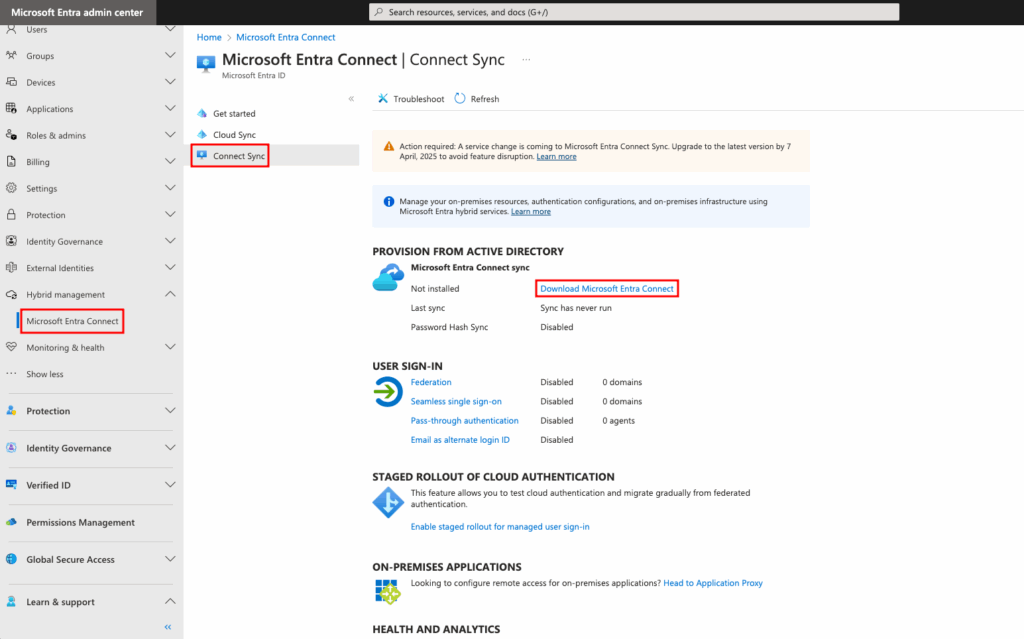
- Access the Microsoft Entra Admin Center.
- Navigate to Identity > Hybrid Management > Microsoft Entra Connect.
- Click Download Microsoft Entra Connect Sync.

1.2 Run the Installation Wizard
- Execute AzureADConnect.msi as Administrator.
- Accept the license terms and select Customize (recommended for enterprise setups).

Step 2: Configure Directory Synchronization
2.1 Connect to Azure AD & On-Prem AD
- Enter Azure AD Global Admin credentials.
- Provide on-premises AD Enterprise Admin credentials.

2.2 Select Sync Scope (OU Filtering)
- Default: Sync all users and groups from all domains.
- Customized: Select specific OUs for synchronization (recommended for security).

Step 3: Configure Authentication Methods
3.1 Choose a Sync Method
| Option | Best For | Considerations |
|---|---|---|
| Password Hash Sync (PHS) | Most organizations | No on-prem dependency after sync. |
| Pass-Through Auth (PTA) | Hybrid environments | Requires on-prem agents. |
| Federation (AD FS) | Strict security needs | Complex setup, high availability required. |

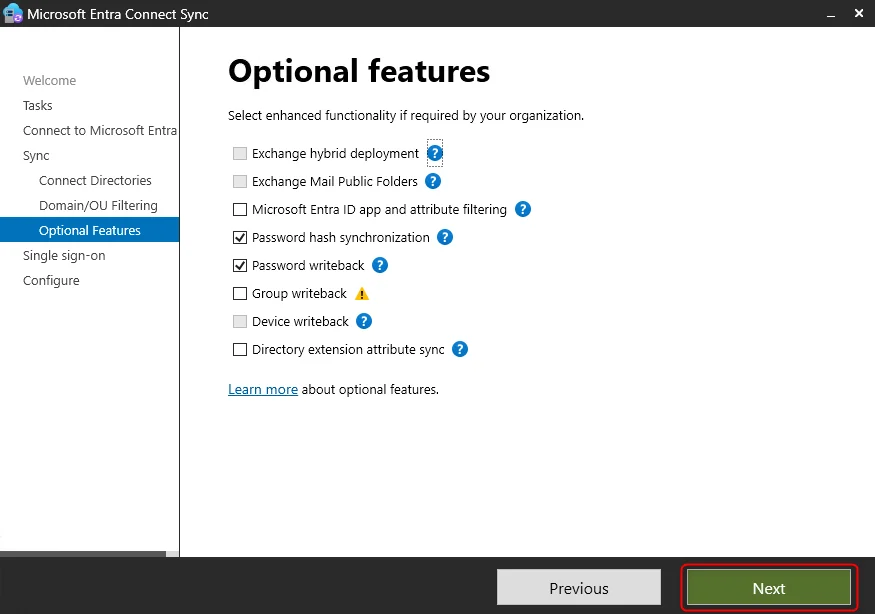
3.2 Enable Optional Features
- Password Writeback – Allow Azure AD password changes to sync back to on-prem AD.
- Group Writeback – Sync Azure AD groups to on-prem AD (requires Exchange Hybrid).
- Device Writeback – Enable hybrid Azure AD join for devices.
Step 4: Start Synchronization & Validate
4.1 Initiate Initial Sync
- Click Install to begin synchronization.
- Monitor progress in Synchronization Service Manager (miisclient.exe).
4.2 Verify Sync Status
- Check the Microsoft Entra Admin Center > Users for synced accounts.
- Use Azure AD Connect Health for real-time sync monitoring.
Advanced Configuration & Troubleshooting
✔ Custom Sync Rules (CSWR)
- Modify default sync rules using Synchronization Rules Editor.
- Example: Exclude service accounts from cloud sync.
✔ Staging Mode for Testing
- Enable Staging Mode to test sync before full deployment.
✔ Common Sync Errors & Fixes
| Issue | Solution |
|---|---|
| Sync failures due to duplicate UPNs | Ensure unique UserPrincipalNames in AD. |
| Missing users after sync | Verify OU filtering and scope. |
| High latency in sync | Check SQL Server performance. |
Conclusion: Best Practices for Entra Connect Sync
- Regularly monitor sync health using Azure AD Connect Health.
- Enable staging mode before major changes.
- Document custom sync rules for audit purposes.
🔗 For more enterprise IT guides, visit CupsDeeps.

