In today’s fast-paced digital landscape, ensuring high availability (HA) for critical services is non-negotiable. Microsoft Server Failover is a cornerstone of business continuity, allowing organizations to maintain uptime even during hardware failures, software crashes, or unexpected disasters.
Table of Contents
By the end, you’ll have a professional, in-depth understanding of Microsoft Server failover, ensuring your infrastructure remains resilient and highly available.
1. What is Failover Clustering in Microsoft Server?
Failover clustering is a high-availability (HA) feature in Windows Server that allows multiple servers (nodes) to work together, ensuring continuous service availability. If one node fails, another automatically takes over, minimizing downtime.
Key Benefits of Failover Clustering
✅ Automatic Failover – Seamless transition during failures.
✅ Load Balancing – Distributes workloads efficiently.
✅ Disaster Recovery – Protects against data center outages.
✅ Shared Storage Support – Uses SAN, iSCSI, or SMB for storage.
Common Use Cases
- SQL Server Always On Availability Groups
- Hyper-V Virtual Machine Failover
- File Server High Availability (FSHA)
- Exchange Server DAG (Database Availability Groups)
2. Step-by-Step Failover Cluster Configuration
Prerequisites
✔ Windows Server (Standard or Datacenter Edition)
✔ Identical Hardware Configuration (Recommended)
✔ Shared Storage (SAN, iSCSI, or SMB 3.0)
✔ Active Directory Domain Services (AD DS)
✔ Static IP Addresses for Cluster Nodes
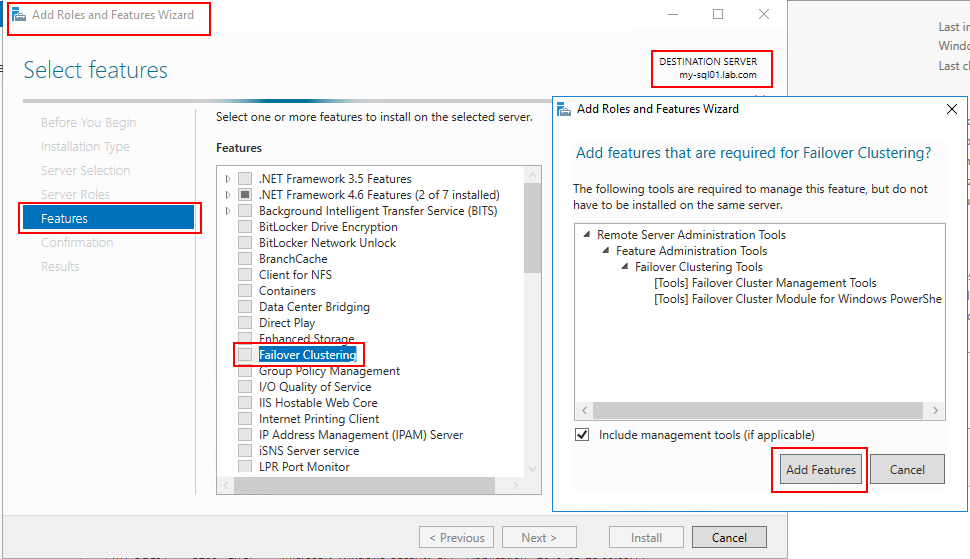
Step 1: Install Failover Clustering Feature
- Open Server Manager → Add Roles and Features.
- Select Role-based or feature-based installation.
- Choose the target server.
- Under Features, select Failover Clustering.
- Complete installation and restart if required.

# Alternatively, use PowerShell:
Install-WindowsFeature -Name Failover-Clustering -IncludeManagementToolsStep 2: Validate Cluster Configuration
Before creating a cluster, validate hardware and software compatibility.
- Open Failover Cluster Manager.
- Click Validate Configuration.
- Add all nodes to be included in the cluster.
- Run all tests (Storage, Network, System Configuration).
- Review the report and fix any warnings/errors.
Step 3: Create a Failover Cluster
- In Failover Cluster Manager, click Create Cluster.
- Add all nodes.
- Assign a Cluster Name and IP Address.
- Configure Quorum Settings (Node Majority, Disk Witness, etc.).
- Finalize and create the cluster.
# PowerShell alternative:
New-Cluster -Name MyCluster -Node Server1,Server2 -StaticAddress 192.168.1.100Step 4: Configure Cluster Roles (High Availability Services)
- Right-click Roles → Configure Role.
- Choose the type (e.g., File Server, SQL Server, Generic Service).
- Assign storage and network resources.
- Set failover and failback policies.
Step 5: Test Failover Functionality
- Manually move a role to another node (Right-click → Move).
- Simulate a failure (shut down a node).
- Verify automatic failover occurs.
3. Best Practices for Microsoft Server Failover Clustering
🔹 Use Identical Hardware – Ensures compatibility.
🔹 Configure Proper Quorum – Prevents “split-brain” scenarios.
🔹 Monitor Cluster Health – Use System Center or PowerShell.
🔹 Regular Backups – Even HA clusters need backups.
🔹 Network Redundancy – Use multiple NICs for heartbeat.
4. Common Failover Scenarios & Troubleshooting
Scenario 1: Node Fails but Failover Doesn’t Trigger
✅ Check:
- Cluster service running?
- Network connectivity between nodes?
- Quorum configuration correct?
Scenario 2: Storage Not Accessible After Failover
✅ Check:
- SAN/iSCSI paths are redundant.
- Multipath I/O (MPIO) is configured.
Scenario 3: Slow Failover Performance
✅ Check:
- Network latency.
- Storage response times.
Conclusion
Microsoft Server Failover Clustering is a powerful, enterprise-grade solution for high availability. By following this guide, you can deploy, configure, and optimize a failover cluster with confidence.
🚀 Pro Tip: Automate monitoring with PowerShell scripts and System Center Operations Manager (SCOM) for proactive management.

